On the couple of occasions I have talked people into trying JetBrains ReSharper (R#), the first thing they seem to notice is that it can optimise your using statements, and that it puts are bar down the right hand side of your editor showing you all the mistakes you have made in bright red and yellow stripes. There is obviously a lot more to ReSharper than that, and I’ve noticed people seem to get as much out of it as they put into it. Here are some of the features I found useful when I first started getting to know ReSharper 3.0.
Navigation
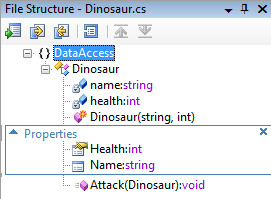
ReSharper introduces many nice ways of finding your way around your code. The File Structure View provides a list of all the members in your current class. Double clicking on a member jumps to that point in the code. You can also rearrange members and manage code #region blocks.
The mechanics of the File Structure View are fantastic, but to me the biggest advantage is the additional awareness it provides. At a glance you can take in all the members in the current file, which means you always have a good awareness of the context in which you are working, such as the class’ current responsibilities.
I dock my File Structure View window to the right of VS and find it invaluable. You can access this window via the ReSharper >> Windows menu, or Ctrl + Alt + F.
ReSharper also provides a number of shortcuts to jump to a file, type, or symbol (Ctrl + T, Ctrl + Shft + T and Shft + Alt + T respectively). This lets you start typing part of the file/type/symbol you are looking for, and pops up an auto-complete box that allows you to quickly jump to the item you are after. Generally much faster than using Solution Explorer.
Other navigation features include an improved (over the standard VS) “Find Usages” feature, and a “Navigate from here…” menu that lets you jump to base, type declaration, function exits and more.
Code Generation
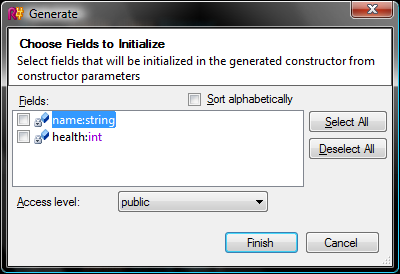
Mashing Alt + Insert opens a code generation menu, from which you can access wizards to generate properties with backing fields, constructors, interface implementations, and even delegations to class members. When I write “wizards”, don’t go picturing Clippy or some equivalent monstrosity – these are actually helpful! For example, the constructor generator lets you select the fields/properties you wish to initialise in the constructor’s parameters and then dumps the constructor into your class. The wizards are generally very keyboard friendly as well, so you don’t have to madly chase your rodent around trying to click obscure buttons or links.
Templates
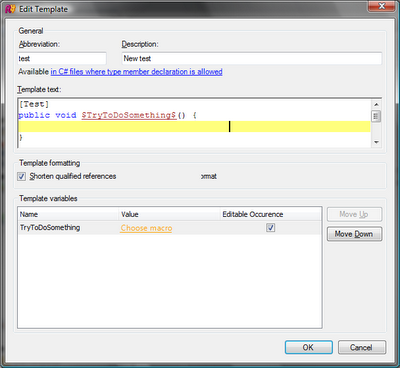
The templates in ReSharper are incredible. There are a couple of templates build in (try typing “foreach<TAB>” into a method that takes any IEnumerable like an array as a parameter. No really, go try it! I’ll wait…), but the real power comes from creating your own Live or Surround With template.
The templates support parameter substitution (i.e. you put a token in your template), and through the template builder UI you can specify exactly how these parameters are populated at run time. For example, you can tell ReSharper to guess the substitution based on the current type, current parameters, or even transform an existing name (such as using the camel-cased version of a Pascal-cased property name).
The educated guesses ReSharper uses are generally spot on, and are used in a number of places throughout the product, such as some of the Quick Fixes.
You use a template by typing part of the name into VS, and selecting the template from the autocomplete menu that pops up.
Refactoring
The standard Visual Studio refactorings are awful. On every PC I have used it has been almost entirely unusable. Trying to rename a private class member tended to cause a complete recompilation of the entire solution and basically take an eternity. ReSharper’s refactorings work in milliseconds, and provide a whole lot more than VS.
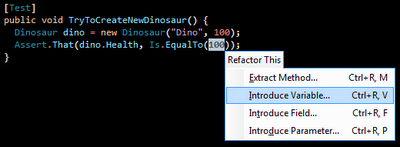
The standard ReSharper 3.0 keymap (not the IntelliJ/ReSharper 2.x one) lets you mash Ctrl + Shft + R to open a context-sensitive refactoring menu. For example, if you highlight a passage of code and hit Ctrl + Shft + R, you can choose Extract Method to move that code to its own method. ReSharper will either instantly apply your refactoring, or open one of its helpful wizards if it needs a bit more data from you to continue.
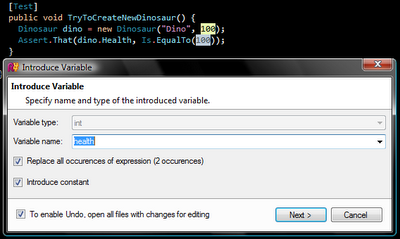
There are also several chords you can press as short cuts to various refactorings, like Ctrl + R, Ctrl + V to apply the Introduce Variable refactoring. The refactoring features of ReSharper are extremely powerful, but in my experience require the most amount of work to learn how to use effectively. Every day I seem to find a new way to use a ReSharper refactoring to make coding easier.
The screen shots below show the “Refactor This” menu that appears after a value is selected and Ctrl + Shft + R is pressed. The second shot shows the Introduce Variable wizard, and the third shows the result.
Intellisense improvements
ReSharper, depending on which options you have specified (ReSharper menu >> Options), augments the standard Intellisense offered by Visual Studio. One option I turn on is to show more info about members, such as the return types. It is a good idea to play around with this to best suit the way you work.
The main thing ReSharper offers in this area is smart autocomplete and type autocomplete. Instead of the default Intellisense triggers such as Ctrl + Space, you can press Ctrl + Shft + Space or Shft + Alt + Space to get ReSharper to intelligently restrict the autocompletion options base on your current context. For example, if you are initialising a variable from a method call and and trigger a type-autocomplete, ReSharper will only show you a list of methods that return a compatible type.
Quick fixes
This is the best feature in my book. Whenever ReSharper finds an error, a suggestion, or recognises a number of common actions in the current context, it will flash up a light bulb and underline the relevant code. The colour of the light bulb and underline will depend on what type of quick fix ReSharper has identified (error, suggestion etc).
When you see  , press Alt + Enter to open the Quick Fix context menu, which will solve all your problems for you.
An example that is really useful when doing TDD is when you write some test code first that does not yet exist. The missing method will be written in red, and the quick fix icon will appear. Pressing Alt + Enter will display the menu shown below:
If you select “Create method…”, a method stub will be generated, and you can TAB through the fields in the template ReSharper uses and fill in the details. The screen shot below shows ReSharper’s suggestions for the parameter name, or you can specify a completely different name.
Another TAB press and you can replace the throw new NotImplementedException(); line with your required implementation:
But wait, there’s more!
There is a Unit Test Runner, an option to cycle through your copy/paste clipboard (Ctrl + Shft + V), more code colouring options (such as greying out dead/unused code), automatic xml-doc generation for parameters, automatic importing of relevant namespaces, dead code removal and more!
Can I have my commission now?
There is so much to ReSharper, and you really will get as much out of it as you put into it. Once you become familiar with it you will find your code almost writing itself. I really recommend exploring the options it offers (ReSharper menu >> Options), as well as looking through and trying all the features. If you want an idea of exactly what can be accomplished, have a look at this video from Ilya Ryzhenkov, .NET Tools Product Manager at JetBrains.
There are only a couple of downsides to ReSharper. One is that you need a decent PC to run it on anything but a trivially sized project – it is a real memory hog, despite improvements being made over v2. Secondly, it is quite easy to become dependent on ReSharper, and feel lost when you go back into normal VS-land. Sometimes I feel like I need to jump back into emacs to remember how to do stuff old-skool :) The other problem with the product is that it leaves you hankering for JetBrains to develop a Visual Studio replacement, say, Intelli.Net :)
Hope this post helps give your ReSharpering a jumpstart. :)
